Center Pop-Up Gate Fold Card

Center Pop-Up Gate Fold Card
  • Save

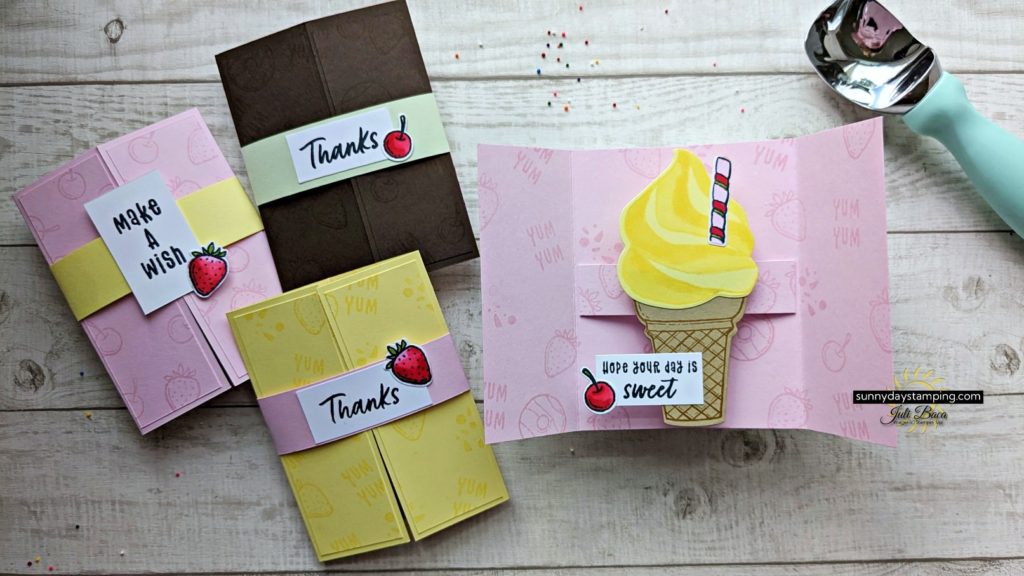
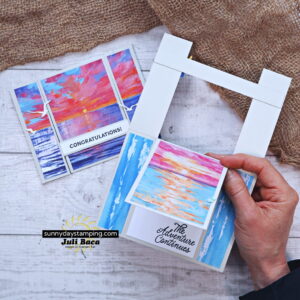
This is not a normal gate fold card! The card stands up on its own with the center image popping right out of the card!  It is way easier to make than it looks with the step-by-step instructions and tips I have to share with you in the video!

Cutting & Scoring Measurements

Bubble Bath

  • Card Base: 8 ½” x 5 ½”
    • Score at 2 1/8”, 4 ¼”, 6 3/8” (easier to score at 2 1/8” from each side and then score down the middle)
  • Front Panels (option 1): 3 3/4″ x 5 1/4”
    • Stamp and then cut in half: (2) 1 7/8” x 5 1/4”
  • Center Strip: 1” x 5 1/8”, score at ½” from each end
  • Focal Point Holder: 1” x 3”, score at ½”, 1”, 2”, 2 ½”

Basic White

  • Panels for back to write a message (optional): (2) 1 7/8” x 5 1/4”
  • Greeting: scrap

Lemon Lolly

  • Scrap for die cut
  • Belly Band: 1 1/4” x 10”

Crum Cake

  • Scrap for die cut

Designer Series Paper (option 2)

  • Front & Inside Panels: (6) 1 7/8” x 5 ¼” (card panels)
  • Envelope (optional): 2 1/4″ x 6”

Get My FREE Print & Make Project Sheets

  • Save
Get my newest project sheet delivered right to your inbox every week! Sign up to receive my free email.

Get Ideas!

Choose YOUR favorite stamp set!  You can use anything as the focal point that pops out of the card.  Use the coordinating die set or you can cut it out with scissors!

I used stamps to decorate the paper.  Using the same color of ink as the cardstock gives a subtle image that doesn’t detract from the main image. 

Alternatively, you can use Designer Series Paper for the panels on the front of the card and on the inside!  All of the panels are the same dimension, so you would need 2 for the front and 4 for the inside.  Make sure to adhere the DSP to the inside BEFORE adding the pop-up mechanism. 

Helpful Diagrams

  • Save

Card Base – Center Strip – Focal Point Holder

Use this diagram as reference for the words used in the Cutting and Scoring Measurements above.  This will also show you what your pieces look like when folded correctly.  Watch the video for easy assembly instructions.

  • Save

This card stands up by itself and the focal point just pops right out at you!  This card template can be used with lots of different stamp sets!  Save this so you can refer back!

Want to Make These Cards?

Click the button below for the full list of all the supplies I used.  If you want to purchase anything, simply add them to your cart.  

Don’t forget to use my host code (at the top of my website) to earn receive my monthly project sheet bundle!

April Specials

Project Sheet Bundle

  • Save

Place a $50 order and enter  host code JYAQPQDP in April and get this 47 Past Project Sheet bundle!  These project sheets have been in my Friday morning emails, but I’m bundling them together this month in case you missed any! Ends April 30, 2024.

Retiring Products Lists

Select items from the Annual Catalog and Winter/Spring Catalog are retiring!  You can save up to 60% on products!  Sale ends April 30, 2024.

May Specials

$207 Worth of Products for $99

When you join Stampin’ Up! in May, in addition to the $125 in products you get to choose, you will also receive the following EXTRA FREEBIES in your starter kit!  

🌞All 5 New InColor Ink Pads – $40.50 value
🌞All 5 New InColor Markers – $17.50 value
🌞Assorted Pack of InColor Cardstock – $11.50 value
🌞InColor Designer Series Paper – $12.50 value
  • Save

May Thank You Gift

Place a $50 order in May and use my HOST CODE (found at the top of my website) and you’ll get this month’s exclusive tutorial bundle!  You will receive a download for 1 versatile card template with exclusive video tutorial showing you how to make it and 4 card making project sheets.

  • Save

New Products!

The NEW Annual Catalog is here and it’s amazing!  Click the button below on May 1st to view all the new things!

If you don’t have a paper catalog, you can purchase one or place a $50 order with me and watch for an email where you can request a free copy.

Thank you so much for visiting my website today!  I would love to answer any of your questions, please reach out to me through e-mail!  If you would like to place a Stampin’ Up! order, I would be thrilled if you selected me to be your demonstrator.

You might also be interested in:

2 Comments

  1. Hilda Burton

    Juli, I love these fun pop-up ice cream cones. They are great for young and old. Thanks for the great video and pictures. Enjoy your day!

Leave a Reply

Your email address will not be published. Required fields are marked *